今回は自分が設定したいルールが npm パッケージにないことを想定して作っていきます。
チームなどで結構こういうのが必要になる場面がたまにあるので、こう言った時にサクッと作れると何かと楽できたりする時があります
また、コーディングガイドを作っても結局守られないみたいなことをなくせます
0. 作成するルール
snakecaseで定義された変数をエラーにするルールを作っていきます
(ESLintのデフォルトルールで camelcaseルール はありますが、今回は入門のため)
const test_variable = 'snake' // error

const testVariable = 'camel' // pass
1. 環境構築
各自ワークスペースに移動し、ディレクトリの作成とpackage.jsonを作成します
$ mkdir eslint-plugin-handson-sample
$ cd eslint-plugin-handson-sample
$ yarn init -y
必要なパッケージを追加
$ yarn add -D eslint typescript @typescript-eslint/parser @types/eslint jest ts-jest
tsconfig.json の作成
$ yarn tsc --init
tsconfig.json を以下に変更します
{
	"compilerOptions": {
    "target": "es2016",
    "module": "commonjs",
    "moduleResolution": "node",
    "esModuleInterop": true,
    "forceConsistentCasingInFileNames": true,
    "strict": true,
    "skipLibCheck": true,
    "rootDir": "./src",
    "outDir": "./lib"
  },
  "exclude": ["**/*.spec.ts"]
}
package.json にscriptsとjestの設定を追加します
{
  ...,
  "scripts": {
    "build": "tsc",
    "test": "jest"
  },
  "jest": {
    "roots": [
      "<rootDir>/src"
    ],
    "moduleFileExtensions": [
      "ts",
      "js"
    ],
    "transform": {
      "^.+\\\\.ts$": [
        "ts-jest",
        {
          "tsconfig": "tsconfig.json"
        }
      ]
    },
    "testEnvironment": "node"
  }
}
これは必須ではないですが、あると便利なので prettier も準備しておきます
$ yarn add -D prettier
$ touch .prettierrc
.prettierrc を以下に編集
{
  "semi": true,
  "singleQuote": true
}
2. ルールの作成
実際にルールを作成していきます
以下の構成で作成していきます
src
├── rules
│   ├── no-snakecase.ts
│   └── __tests__
│       └── no-snakecase.spec.ts
└── index.ts // rules配下のルール等をまとめる
src/rules/no-snakecase.ts を作成
ESLintのデフォルトリコメンドルールで camelcase があり、違う命名にしておいた方がルールのバッティングなど回避できるので今回は no-snakecase と命名します
eval()を禁止する場合はno-eval、debuggerを禁止する場合はno-debuggerのように、何かを禁止するルールの場合は、noをプレフィックスとして付ける- ルールが何かを含めることを強制するものである場合、特別な接頭辞のない短い名前を使用する
- 単語と単語の間にハイフンを使用する
基本的なフォーマットとしては以下の形のオブジェクトをexportします
module.exports = {
    meta: {
			// ルールの説明、autofix可能かなどのメタ情報を定義
    },
    create: function(context) {
        return {
            // ASTに対して解析ロジックを書いていく
        };
    }
};
- meta
- ルールのタイプ、説明やルールへのリンク、autofix関連についてのメタ情報を定義
- create
- ASTに対しての解析ロジックを含むオブジェクトをreturnする
- 引数に context を受け取ります
- context.report メソッドが発火されると、lint時にエラーや警告を発します
- そのため、最終的にはASTを探っていき期待される状態で cotext.report を発火させるためにロジックを書いていきます
- その他解析に必要な情報やロジックが色々入っている
import { Rule } from 'eslint';

export const rule: Rule.RuleModule = {
  meta: {
    type: 'problem',
  },
  create: (context) => {
    const isSnakeCaseVariable = (name: string) => {
      // 先頭と末尾の_を取り除く
      const nameBody = name.replace(/^_+|_+$/gu, '');

      // 定数(ex: TEST_VARIABLE)の場合は該当させない
      return nameBody.includes('_') && nameBody !== nameBody.toUpperCase();
    };

    return {
      VariableDeclarator: (node) => {
        context.getDeclaredVariables(node).forEach((variable) => {
          if (isSnakeCaseVariable(variable.name)) {
            context.report({
              message: 'camelcaseで定義してください',
              node,
            });
          }
        });
      },
    };
  },
};
meta
type
problemsuggestionlayoutの3種類で設定
他にも設定できるオプションはありますが、今は設定不要なのでこれだけ指定しておきます
create
まずエラーにしたい const test_variable = 'test' をAST Exprolerで見てみる
{
  "type": "Program",
  "body": [
    {
      "type": "VariableDeclaration",
      "declarations": [
        {
          "type": "VariableDeclarator",
          "id": {
            "type": "Identifier",
            "name": "test_variable",
            "range": [
              6,
              19
            ]
          },
          "init": {
            "type": "Literal",
            "value": "test",
            "raw": "'test'",
            "range": [
              22,
              28
            ]
          },
          "range": [
            6,
            28
          ]
        }
      ],
      "kind": "const",
      "range": [
        0,
        28
      ]
    }
  ],
  "sourceType": "module",
  "range": [
    0,
    29
  ]
}
一つの式の塊ごとにbody内にオブジェクトが作られます
その式のtypeが頭のtype keyで示されており、この場合は VariableDeclaration
name: "test_variable" を判定に使う為位置を確認しておきます
return {
  VariableDeclarator: (node) => {
   ...
ASTのtype keyと同じキーを設定することで該当のtypeのオブジェクトだけをfilterしたnodeオブジェクトを引数から取得できます。
今回の場合は引っ掛けたいname: "test_variable" は VariableDeclarator にあるのでこれをキーに設定します
    const isSnakeCaseVariable = (name: string) => {
      // 先頭と末尾の_を取り除く
      const nameBody = name.replace(/^_+|_+$/gu, '');

      // 定数(ex: TEST_VARIABLE)の場合は該当させない
      return nameBody.includes('_') && nameBody !== nameBody.toUpperCase();
    };

    return {
      VariableDeclarator: (node) => {
        context.getDeclaredVariables(node).forEach((variable) => {
          if (isSnakeCaseVariable(variable.name)) {
            context.report({
              message: 'camelcaseで定義してください',
              node,
            });
          }
        });
      },
    };
そうすると引数nodeが以下のようにとれますが該当のvariableまでアクセスするために contextに用意されている getDeclaredVariables を使用してオブジェクトを取得します
で定数や他のケースを想定した加味した上で [context.report](<http://context.report>) を発火します
messageの定義に加えて、nodeもしくはlocオプションが必要となります
ref: Custom Rules - ESLint - context.report
<ref *1> {
      type: 'VariableDeclarator',
      id: {
        type: 'Identifier',
        name: 'test_variable',
        range: [ 6, 19 ],
        loc: { start: [Object], end: [Object] },
        parent: [Circular *1]
      },
      init: {
        type: 'Literal',
        value: 'test',
        raw: "'test'",
        range: [ 22, 28 ],
        loc: { start: [Object], end: [Object] },
        parent: [Circular *1]
      },
      range: [ 6, 28 ],
      loc: { start: { line: 1, column: 6 }, end: { line: 1, column: 28 } },
      parent: {
        type: 'VariableDeclaration',
        declarations: [ [Circular *1] ],
        kind: 'const',
        range: [ 0, 28 ],
        loc: { start: [Object], end: [Object] },
        parent: {
          type: 'Program',
          body: [Array],
          sourceType: 'script',
          range: [Array],
          loc: [Object],
          tokens: [Array],
          comments: [],
          parent: null
        }
      }
    }
src/rules/index.ts のファイルを作成し、ruleをexportします
これによって実際にruleの使用が可能になります
import * as NO_SNAKECASE from './rules/no-snakecase';

module.exports = {
  'no-snakecase': NO_SNAKECASE.rule,
};
3. テストの作成
次に書いたコードが正しいかをテストから確認していきます
src/rules/__tests**__**/no-snakecase.spec.ts を作成し以下を記述します
import { RuleTester } from 'eslint';
import { rule } from '../no-snakecase';

const tester = new RuleTester({
  parser: require.resolve('@typescript-eslint/parser'),
});

tester.run('no-snakecase', rule, {
  valid: [
    `const testVariable = 'test'`,
    `const TEST_VARIABLE = 'test'`,
    `const _testVariable = 'test'`,
  ],
  invalid: [
    {
      code: `const test_variable = 'test'`,
      errors: [
        {
          message: 'camelcaseで定義してください',
        },
      ],
    },
  ],
});
eslintパッケージが RuleTester ユーティリティ を提供してくれているためテストは直感的に書けます
その際に今回はTSをparseできる必要があるためparserの設定も追加します
あとは見たままで特に説明は不要かな?
yarn test を実行するとpassすることが確認できます
PASS  src/rules/__tests__/camelcase.spec.ts
  camelcase
    valid
      ✓ const testVariable = 'test' (445 ms)
      ✓ const TEST_VARIABLE = 'test' (3 ms)
      ✓ const _testVariable = 'test' (1 ms)
    invalid
      ✓ const test_variable = 'test' (3 ms)

Test Suites: 1 passed, 1 total
Tests:       4 passed, 4 total
Snapshots:   0 total
Time:        2.964 s, estimated 4 s
Ran all test suites related to changed files.
4. 他のケースを考慮してロジックを追加する
上記で簡単なケースが出来ましたが、実際snakecaseの変数が定義されるケースは様々あります
以下本家のテストコードを見ると「snakecaseを禁止する」と言っても膨大なケースの考慮が必要なことがわかります
eslint/camelcase.js at main · eslint/eslint
よくASTがいじるの難しいと言われる所以はこのあたりなのかなと思います
今回は追加のロジック追加として関数の引数のsnakecaseを禁止するルールを追加します
function testFunc(test_arg){} // error

function testFunc(testArg){} // pass
今回はTDD的にテストケースを先に書いてから実装していきます
// src/rules/__tests__/no-snakecase.spec.ts

tester.run('no-snakecase', rule, {
  valid: [
    `const testVariable = 'test'`,
    `const TEST_VARIABLE = 'test'`,
    `const _testVariable = 'test'`,
    `function testFunc(firstArg){}`, // 追加
    `function testFunc(firstArg, secondArg){}`, // 追加
  ],
  invalid: [
    {
      code: `const test_variable = 'test'`,
      errors: [
        {
          message: 'camelcaseで定義してください',
        },
      ],
    },
    // -- 以下のobjを追加 --
    {
      code: `function testFunc(first_arg){}`,
      errors: [
        {
          message: 'camelcaseで定義してください',
        },
      ],
    },
		{
      code: `function testFunc(first_arg, second_arg){}`,
      errors: [
        {
          message: 'camelcaseで定義してください',
        },
        {
          message: 'camelcaseで定義してください',
        },
      ],
    },
    // -- ここまで --
  ],
});
yarn test src/rules/__tests__/no-snakecase.spec.ts --watch を実行するとtestがfailすることが確認出来ます
では今回のASTをASTExploerで見ると以下のJSONが参照できます
{
  "type": "Program",
  "body": [
    {
      "type": "FunctionDeclaration",
      "id": {
        "type": "Identifier",
        "name": "testFunc",
        "range": [
          9,
          17
        ]
      },
      "generator": false,
      "expression": false,
      "async": false,
      "params": [
        {
          "type": "Identifier",
          "name": "test_arg",
          "range": [
            19,
            27
          ]
        }
      ],
      "body": {
        "type": "BlockStatement",
        "body": [],
        "range": [
          29,
          31
        ]
      },
      "range": [
        0,
        31
      ]
    }
  ],
  "sourceType": "module",
  "range": [
    0,
    31
  ]
}
さっきの要領で見ると FunctionDeclaration というtypeの中の params 内の Identifier typeの name を参照できるとよさそうです
return {
      VariableDeclarator: (node) => {
        context.getDeclaredVariables(node).forEach((variable) => {
          if (isSnakeCaseVariable(variable.name)) {
            context.report({
              message: 'camelcaseで定義してください',
              node,
            });
          }
        });
      },
    // -- 以下を追加 --
      FunctionDeclaration: (node) => {
        context.getDeclaredVariables(node).forEach((variable) => {
          variable.identifiers.forEach((identifier) => {
            if (isSnakeCaseVariable(identifier.name)) {
              context.report({
                message: 'camelcaseで定義してください',
                node,
              });
            }
          });
        });
      },
    // -- ここまで --
    };
するとテストがpassすることが確認出来ます
なお、 lint -fix すると自動でコードfixをしてくれる機能がありますが、問題あるコードをどうfixさせるかのロジックも書けます
Working with Rules - ESLint - Pluggable JavaScript Linter
5. 実際に使用する
実際にこのルールをプロダクトで使用するには
- npm パッケージとしてpublishする
- localruleとして同リポジトリ内にルールを作成する
の2つかなと思います
npm パッケージとしてpublishする
ここはハンズオンだとちょっとアレなので今回は割愛しますが
yarn build で静的なjsにbuildした上で以下など参考にpublishしてください
なお、eslint pluginとしてpublishする際は eslint-plugin-xxx との命名規則があるためそれに従いましょう
ちなみに今回のhandsonの内容を公開したやつ ↓
eslint-plugin-kskymst-handson-sample
// .eslintrc.js
module.exports = {
    ...略
    plugins: ['kskymst-handson-sample'],
    rules: {
        'kskymst-handson-sample/no-snakecase': 'error',
    },
}
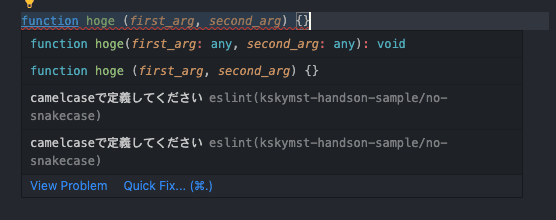
エラーの状態でlint回してみると
動いてますね
エディタ上でも確認出来ます
localruleとして同リポジトリ内にルールを作成する
npmパッケージとして公開はせず、同リポジトリ内で使うカスタムルールの設定も出来ます
以下を参考


